Date: 27 May 2026
How to Root Plumeria Cuttings: The Dry Method for Success
How to Root Plumeria Cuttings: The "Dry" Method for Success ✔️
Plumeria cuttings root with incredible ease if you respect their succulent nature. Most failures come from two mistakes: planting too early and watering too much. Whether you use the traditional potting method or the professional Thailand "Surface" Method, the secret is: Keep it dry until it grows
While cuttings are easy, they develop shallow, horizontal root systems.
Best for: Pots and sheltered garden spots.
For windy or hurricane-prone areas: Consider Grafted Plumeria. Grafted trees use a seedling rootstock with a strong taproot, providing much better anchoring and long-term stability.
Before a cutting ever touches soil, it must heal.
Cut: Take healthy branches 6-12 inches long and remove all leaves.
Cure: Place the cuttings in bright shade with plenty of airflow.
The Goal: Wait 3-5 days until the cut end is bone-dry, firm, and callused.
Pro Tip: Planting a "wet" cutting is the #1 cause of stem rot. If it isn't callused, do not plant it.
Plumerias hate "wet feet." You need a medium that drains instantly.
The Recipe: 50% professional potting mix (like Top Tropicals Abundancу mix) and 50% coarse sand.
Why it works: The bark provides structure, while the sand ensures water runs straight through, leaving no stagnant moisture.
You have two proven ways to set your cuttings:
Method A: The Traditional Pot
1. Hormone (Optional): Dip the dry end in rooting hormone and tap off the excess.
2. Depth: Insert only 2–3 inches deep. Roots emerge from the base, not the stem.
3. Secure: Firm the soil so the cutting doesn't wobble.
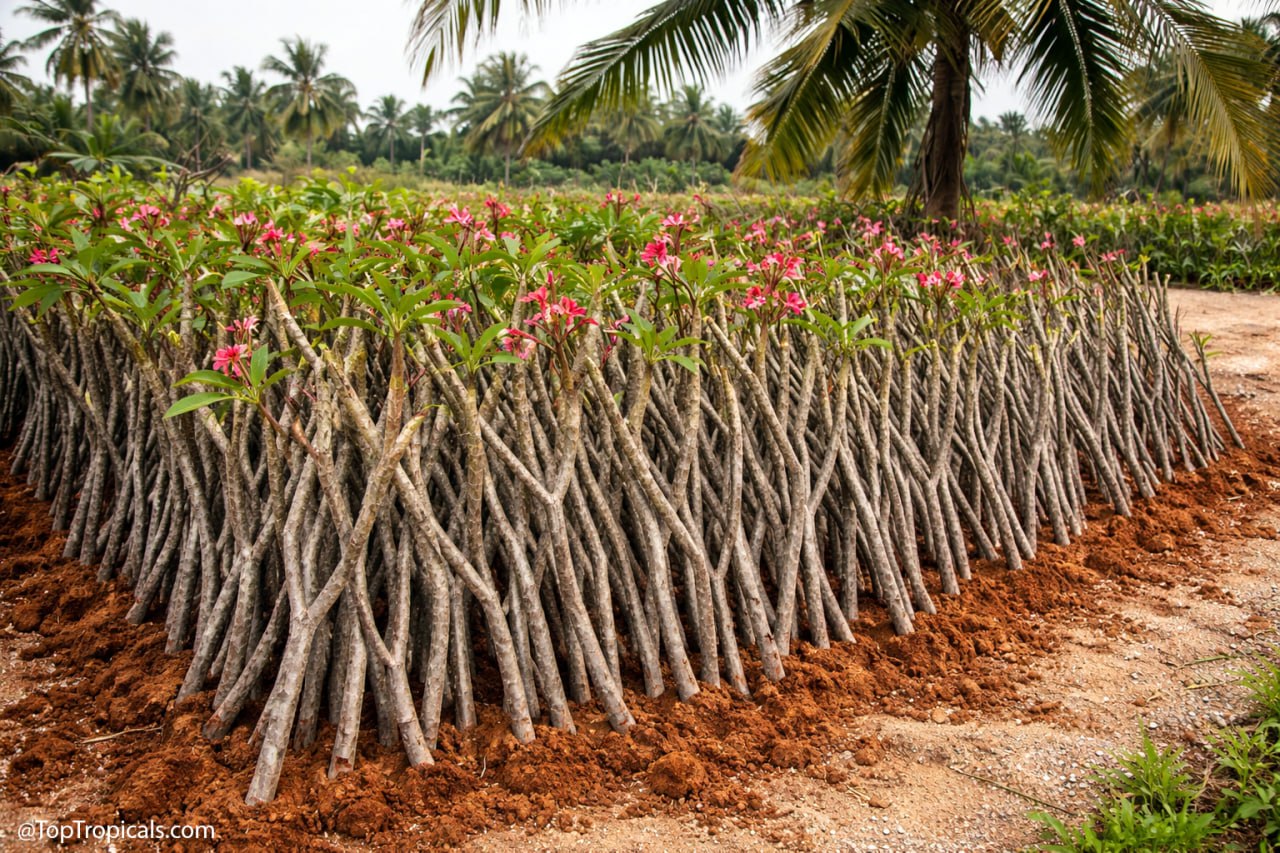
Method B: The Thailand Style (Surface Rooting)
As seen in the image, large-scale growers often don't bury cuttings at all.
1. The Bed: Prepare a bed of well-draining soil.
2. The Placement: Stand the cuttings on top of the soil, leaning them against each other or a support.
3. The Benefit: This provides maximum airflow to the base and zero risk of rot. Roots will naturally dive into the soil as they emerge.
This is where most gardeners fail.
Initial Watering: After planting, moisten the soil slightly—just once.
The Wait: Do not water again for 5–7 days. The Logic: No roots = No water intake. If the soil stays wet without roots to drink it, the cutting will rot.
Sun: Start in bright shade for a few days, then move to full sun. Heat is the catalyst for root growth.
Ground Heat: Placing pots on a warm surface (like a concrete patio or black ground cover) can accelerate rooting.
Airflow: Never root plumeria in a humid greenhouse or enclosed space. They need "open air" to thrive.
2-4 Weeks: Callusing ends and initial roots form.
4-8 Weeks: New leaf "claws" appear at the tip.
Success: Once you see full leaves, you can begin a regular watering and fertilization schedule.
Dry the cutting for 3–5 days.
Use 50% sand for instant drainage.
Plant shallow (or use the Thailand surface method).
Wait a week before watering again.
Provide maximum sun and airflow.
Avoid frequent watering. If you think it’s time to water, wait one more day.
Plumeria cuttings have no roots to drink with yet.
If the soil looks dry and you feel the urge to water, wait 24 hours. When in doubt, keep it dry.
Remember: You can save a dry cutting, but you can't save a rotten one.
🛒 Shop Grafted Plumeria Collection
📚 Learn more:
· Plumeria varieties in Plant Encyclopedia
· #PlumeriaRainbow
#Perfume_Plants #Container_Garden #How_to #Discover


🟢 Join 👉 TopTropicals
Plumeria cuttings root with incredible ease if you respect their succulent nature. Most failures come from two mistakes: planting too early and watering too much. Whether you use the traditional potting method or the professional Thailand "Surface" Method, the secret is: Keep it dry until it grows
✍️ Stability Note: Cuttings vs. Grafted Trees
While cuttings are easy, they develop shallow, horizontal root systems.
Best for: Pots and sheltered garden spots.
For windy or hurricane-prone areas: Consider Grafted Plumeria. Grafted trees use a seedling rootstock with a strong taproot, providing much better anchoring and long-term stability.
- 🌸 5 steps how to root plumeria cuttings - simple method that works
- 🌸 Step 1: Prepare and Cure (The 5-Day Rule)
Before a cutting ever touches soil, it must heal.
Cut: Take healthy branches 6-12 inches long and remove all leaves.
Cure: Place the cuttings in bright shade with plenty of airflow.
The Goal: Wait 3-5 days until the cut end is bone-dry, firm, and callused.
Pro Tip: Planting a "wet" cutting is the #1 cause of stem rot. If it isn't callused, do not plant it.
🌸 Step 2: Use Fast-Draining Soil
Plumerias hate "wet feet." You need a medium that drains instantly.
The Recipe: 50% professional potting mix (like Top Tropicals Abundancу mix) and 50% coarse sand.
Why it works: The bark provides structure, while the sand ensures water runs straight through, leaving no stagnant moisture.
🌸 Step 3: Planting & The "Thailand Method"
You have two proven ways to set your cuttings:
Method A: The Traditional Pot
1. Hormone (Optional): Dip the dry end in rooting hormone and tap off the excess.
2. Depth: Insert only 2–3 inches deep. Roots emerge from the base, not the stem.
3. Secure: Firm the soil so the cutting doesn't wobble.
Method B: The Thailand Style (Surface Rooting)
As seen in the image, large-scale growers often don't bury cuttings at all.
1. The Bed: Prepare a bed of well-draining soil.
2. The Placement: Stand the cuttings on top of the soil, leaning them against each other or a support.
3. The Benefit: This provides maximum airflow to the base and zero risk of rot. Roots will naturally dive into the soil as they emerge.
🌸 Step 4: Critical Watering Rules
This is where most gardeners fail.
Initial Watering: After planting, moisten the soil slightly—just once.
The Wait: Do not water again for 5–7 days. The Logic: No roots = No water intake. If the soil stays wet without roots to drink it, the cutting will rot.
🌸 Step 5: Heat, Light, and Air
Sun: Start in bright shade for a few days, then move to full sun. Heat is the catalyst for root growth.
Ground Heat: Placing pots on a warm surface (like a concrete patio or black ground cover) can accelerate rooting.
Airflow: Never root plumeria in a humid greenhouse or enclosed space. They need "open air" to thrive.
🌸 What to Expect
2-4 Weeks: Callusing ends and initial roots form.
4-8 Weeks: New leaf "claws" appear at the tip.
Success: Once you see full leaves, you can begin a regular watering and fertilization schedule.
✅ Quick Success Checklist
Dry the cutting for 3–5 days.
Use 50% sand for instant drainage.
Plant shallow (or use the Thailand surface method).
Wait a week before watering again.
Provide maximum sun and airflow.
❌ What NOT to do:
Avoid frequent watering. If you think it’s time to water, wait one more day.
Plumeria cuttings have no roots to drink with yet.
If the soil looks dry and you feel the urge to water, wait 24 hours. When in doubt, keep it dry.
Remember: You can save a dry cutting, but you can't save a rotten one.
🛒 Shop Grafted Plumeria Collection
📚 Learn more:
· Plumeria varieties in Plant Encyclopedia
· #PlumeriaRainbow
#Perfume_Plants #Container_Garden #How_to #Discover