Garden Blog - Top Tropicals

Date: 8 Aug 2019

How to grow Parijat indoors in winter

Q: I purchased Parijat plant last year spring. It had good growth in Summer, after that I kept the plant inside the house in winter. A couple of weeks it was ok, after that the plant lost leaves. What is a better idea for growing Parijat plant indoors in Winter?

A: Nyctanthes arbor-tristis, Parijat - is a semi-deciduous plant, which means, it may lose its leaves during unfavorable conditions such as drought, cold, low light and/or humidity. In your case, the plant dropped leaves because of the stress of moving indoors that includes reducing light and humidity levels. When a tropical plant loses leaves during winter, this means it goes into a dormant stage. If this happens, you need to reduce watering and keep the plant on a dry side, water in only when the top level of the soil feels dry to touch. Do not fertilize.
Try to place the plant in a well-lit spot such as a windowsill. If the windowsill and the window glass feel too cold for touch during wintertime, you may place a sheet of a Styrofoam underneath the pot, and a sheet of a bubble-wrap between the plant and the window glass, to create an extra barrier from cold. The plant may re-leaf during wintertime; if not, it may wait until spring, be patient.
Bring it back into outdoor light when minimum temperatures rise above 65F and resume fertilizing.

Recommended fertilizers for fragrant plants:

Pink N Good Daily Plant Food - Flower Booster
Plumeria Top Dress - Smart-Release Booster
SUNSHINE SuperFood - microelement supplement

Date: 4 Jul 2019

Planting and mulching during hot summer

Q: I would like to buy some trees and vines for my garden but I am not sure if it is a good time for planting. It's hot now in Florida. Should I wait till it cools off? If I plant now, can I rely on sprinklers?

A: Summer is always a good time for establishing plants because this is the time of the most vigorous growth. For the first 2-4 weeks, plants should be watered daily with a garden hose as you can not rely on sprinkler system yet. Mulch around plants generously - this will help:
- Maintain moisture
- Maintain soil temperature - protect roots from heat
- Reduce weeds and grasses
- Provide nutrients to the soil, and
- Reduce wind erosion from uncovered soils

Date: 25 Jun 2019

How soon will Guava tree fruit?

Q: Can you tell me how your Guava trees are propagated? Grown from seed vs. air grafted, etc.? I'm interested especially in the Barbie variety. In particular, I'd like to know how long it takes them to bear fruit - I live in Southern California zone 10b, with good sunlight.

A: Guavas can be propagated by seed, air layers, or grafting. Propagation method depends on the species.
Cattley guavas - Psidium littorale - are usually grown from seeds and start flowering and producing as early as in 2-3 years from seed. Tropical guavas, Psidium guajava - especially named varieties, are propagated usually by air layers, and the rarest varieties like Variegated Honey Moon are often grafted, although they will come true from seed (it's just takes them longer to fruit). Both air-layered and grafted plants start producing right away, usually on the same year of planting or next year, depending on growing conditions.
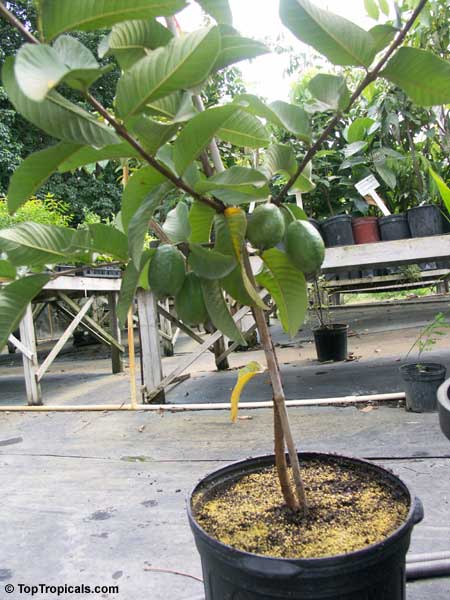
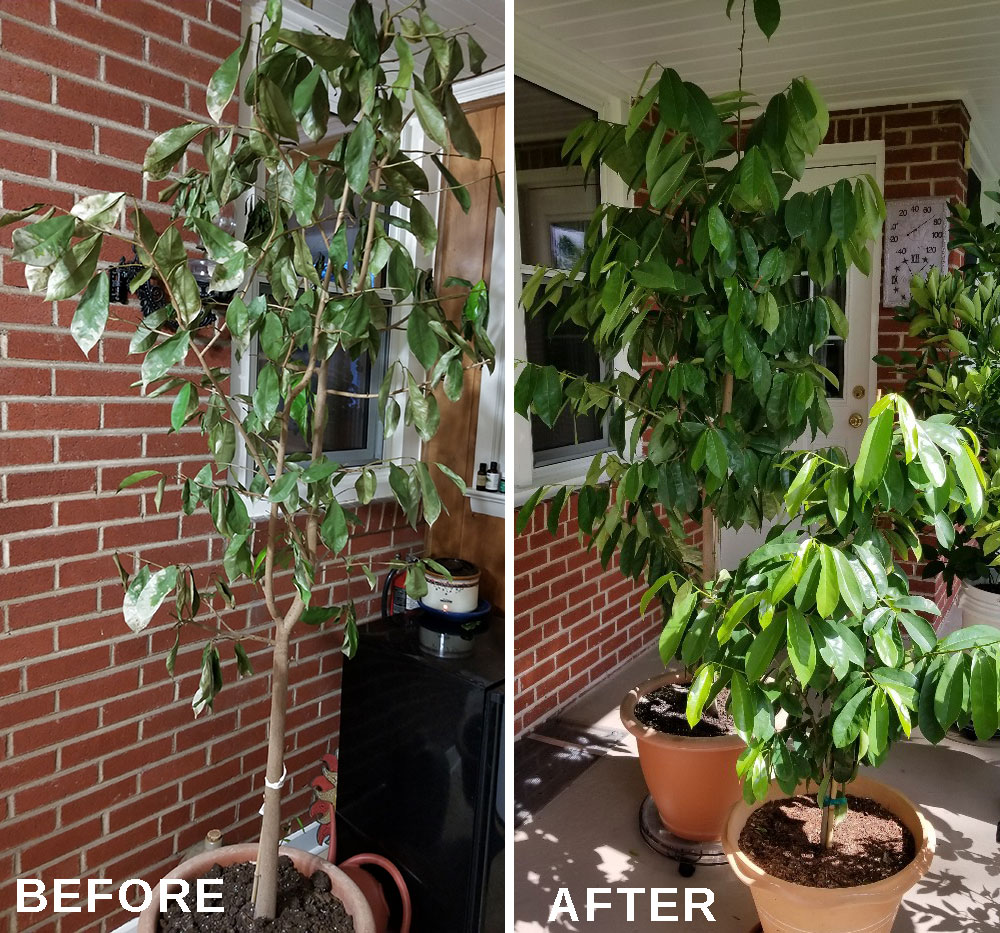
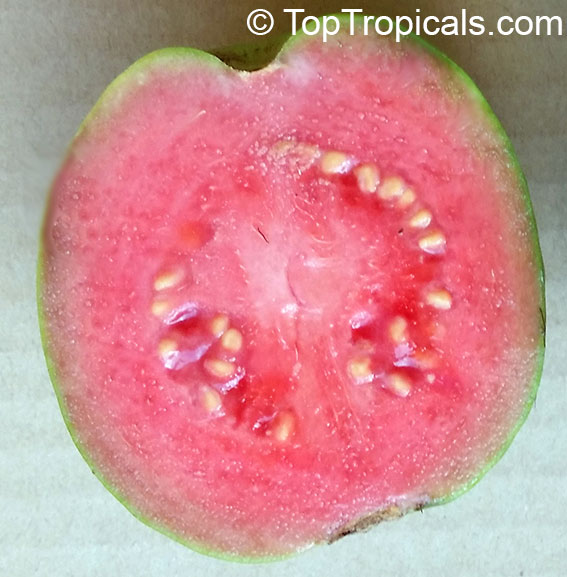
Barbie Pink is a superior variety, very popular among fruit lovers. It produces large aromatic fruit with a bright pink pulp and very few seeds. This variety is air-layered; in our nursery, these plants start flowering and setting fruit in 3 gal containers.
Plant this tree in full sun and provide regular watering, guavas don't like to dry out. Use fertile soil, with at least 50% of compost, and add some soil conditioning components for better drainage: bark, sand, perlite, etc. Mulch well, just make sure to keep mulch 2-3"away from the trunk. Follow our detailed planting instructions that come with every plant, and you are good to go!

Recommended fertilizers:

Fruit Festival Plant Food - Super Crop Booster
Mango-Food - Smart Release Fruit Tree Booster

Date: 31 Jul 2025

Shady spots aren't a problem - they're an opportunity

Niki  and  Cash,  the  PeopleCats.garden  rescued  cats,  lounging  on  a  pink  towel  in  front  of  a  bathtub  surrounded  by  tropical  houseplants.  The  room  is  filled  with  lush  green  foliage,  hanging  vines,  and  potted  plants,  creating  a  peaceful  indoor 
 jungle.

Photo above: Niki and Cash, the Top Tropicals PeopleCats-in-residence, lounging in a lush indoor jungle

Most tropical gardens have at least one corner that gets morning light, filtered sun, or just bright shade - and that's exactly where Anthuriums thrive, along with many other shade-loving plants. That makes them ideal for spaces where other tropicals struggle.

Don't have a greenhouse? You don't need one. Anthuriums do beautifully on a shaded porch, in a screened lanai, or even indoors near a north or east-facing window. They're perfect for:

  • Bathrooms with natural light
  • Bright kitchens with indirect sun
  • Shaded entryways or under eaves
  • Hanging baskets under tree cover
  • Mounting on cork or wood in humid areas

Even a small space can feel like a tropical conservatory with the right plant - and Anthuriums bring that look without being demanding. They grow slowly, stay manageable, and don't need constant pruning or repotting.

Best of all, they reward consistency. Keep them warm, give them some humidity, water when the top inch feels dry, and they'll stay healthy for years. No drama - just quiet, lasting beauty. If you've never grown tropicals in the shade, this is where to start.

Watch Top Tropicals videos about anthuriums

Shop Shade Garden

Date: 18 Aug 2025

Step Up Your Plants Before Fall

Tropical  plants  in  containers
Tropical Plants Ready for Repotting

After a busy summer of growth, many potted plants are bursting out of their containers. Now is the perfect time to step them up into a slightly larger pot.

🌱 Why now in August?

Repotting before fall gives roots room to expand, while there’s still warmth for active growth. Plants have time to sprout new shoots, fill out, and build strength before cooler weather slows them down.

✂️ Trim and Shape

This is also your last chance to give plants a light trim. Pinching or cutting back helps them branch, bush out, and get denser — exactly what you want going into fall.

💚 Add Green Magic

When repotting, mix in Sunshine controlled-release Green Magic fertilizer to reduce transplant stress and boost new root growth. It helps plants settle in quickly and keep thriving.

👉 Watch our on how to step up your plant the right way, then check your pots — some of your summer growers are ready to move up!

⚠️ Important Note on Timing

This advice is for gardeners in warm climates or for anyone who still has at least a month of warm weather left. Tropical plants go dormant when temperatures drop below 75F, so planting in a larger pot at that time may cause root rot — roots stop growing in dormancy, and extra moisture in the soil can lead to rotting.

Repotting,  potting  soil  and  fertilizer

Watch repotting video

How to Repot a Plant Properly

  1. Choose the Right Pot

    Pick a pot just a few inches larger than the old one.

    Make sure it has good drainage — tropical plants hate sitting in water. A pot without drainage holes can cause waterlogging and root rot.

  2. Why plastic pots are better than fancy ceramic

    Ceramic pots may look pretty, but they are heavy, breakable, and often lack proper drainage. Plastic pots are lightweight, easier to handle, and — most importantly — if a plant is root-bound and stuck, you can simply cut the plastic pot to free it without harming the roots. For looks, slip the plastic pot inside a decorative cover pot.

  3. Add Soil and Fertilizer

    Place fresh potting soil at the bottom. Mix in a good fertilizer — we use Sunshine Green Magic.

  4. Remove the Plant

    Why turn it upside down? Gravity helps loosen the plant, and it slides out more easily without tugging.

    Never pull a plant by its head (stems or leaves). That can damage the crown and tear roots.

    If it doesn’t come out easily: lay the pot on its side and gently squeeze or tap the pot to dislodge the soil. If it is really stuck, cut the old pot instead of forcing the plant.

  5. Check the Root System

    If roots are circling tightly (pot-bound), gently untangle or loosen the outside layer so they will grow outward into the new soil.

    Do not shake off or remove old soil from the root ball. Roots have tiny hairs that absorb water and nutrients, and damaging them will set the plant back. Keep the root mass intact and disturb as little as possible.

  6. Set at the Same Level

    Place the plant in the new pot so it sits at the same soil level as before.
    👉 This is important: burying the stem too deep can suffocate it, while setting the plant higher than before may expose roots and cause drying. Keeping the level the same protects the root crown.

  7. Fill and Firm

    Add more soil and fertilizer around the sides. Press lightly around the edges to remove air pockets.

  8. Water Thoroughly

    Give it a deep watering to help roots settle.

  9. Aftercare

    Don’t water again until the top inch of soil feels dry. Freshly repotted plants are vulnerable to soggy soil and root rot if kept too wet.

Watch the video how to repot properly

Shop Garden Supplies