Garden Blog - Top Tropicals

Date: 18 Aug 2025

Step Up Your Plants Before Fall

Tropical  plants  in  containers
Tropical Plants Ready for Repotting

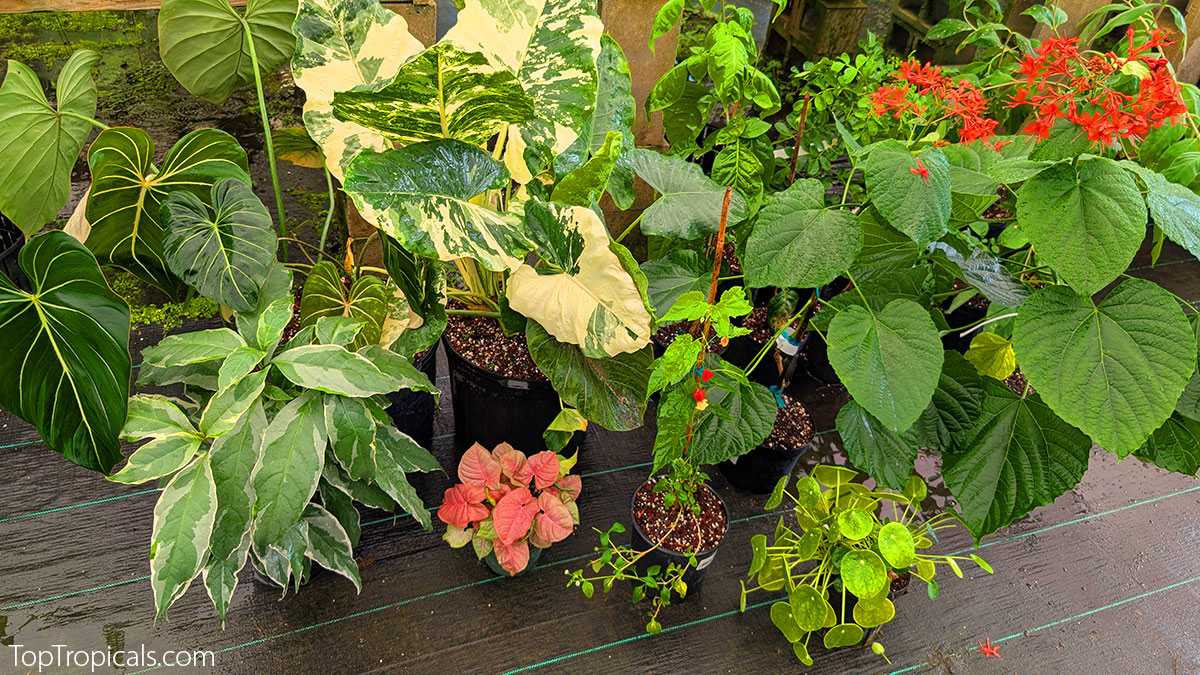
After a busy summer of growth, many potted plants are bursting out of their containers. Now is the perfect time to step them up into a slightly larger pot.

🌱 Why now in August?

Repotting before fall gives roots room to expand, while there’s still warmth for active growth. Plants have time to sprout new shoots, fill out, and build strength before cooler weather slows them down.

✂️ Trim and Shape

This is also your last chance to give plants a light trim. Pinching or cutting back helps them branch, bush out, and get denser — exactly what you want going into fall.

💚 Add Green Magic

When repotting, mix in Sunshine controlled-release Green Magic fertilizer to reduce transplant stress and boost new root growth. It helps plants settle in quickly and keep thriving.

👉 Watch our on how to step up your plant the right way, then check your pots — some of your summer growers are ready to move up!

⚠️ Important Note on Timing

This advice is for gardeners in warm climates or for anyone who still has at least a month of warm weather left. Tropical plants go dormant when temperatures drop below 75F, so planting in a larger pot at that time may cause root rot — roots stop growing in dormancy, and extra moisture in the soil can lead to rotting.

Repotting,  potting  soil  and  fertilizer

Watch repotting video

How to Repot a Plant Properly

  1. Choose the Right Pot

    Pick a pot just a few inches larger than the old one.

    Make sure it has good drainage — tropical plants hate sitting in water. A pot without drainage holes can cause waterlogging and root rot.

  2. Why plastic pots are better than fancy ceramic

    Ceramic pots may look pretty, but they are heavy, breakable, and often lack proper drainage. Plastic pots are lightweight, easier to handle, and — most importantly — if a plant is root-bound and stuck, you can simply cut the plastic pot to free it without harming the roots. For looks, slip the plastic pot inside a decorative cover pot.

  3. Add Soil and Fertilizer

    Place fresh potting soil at the bottom. Mix in a good fertilizer — we use Sunshine Green Magic.

  4. Remove the Plant

    Why turn it upside down? Gravity helps loosen the plant, and it slides out more easily without tugging.

    Never pull a plant by its head (stems or leaves). That can damage the crown and tear roots.

    If it doesn’t come out easily: lay the pot on its side and gently squeeze or tap the pot to dislodge the soil. If it is really stuck, cut the old pot instead of forcing the plant.

  5. Check the Root System

    If roots are circling tightly (pot-bound), gently untangle or loosen the outside layer so they will grow outward into the new soil.

    Do not shake off or remove old soil from the root ball. Roots have tiny hairs that absorb water and nutrients, and damaging them will set the plant back. Keep the root mass intact and disturb as little as possible.

  6. Set at the Same Level

    Place the plant in the new pot so it sits at the same soil level as before.
    👉 This is important: burying the stem too deep can suffocate it, while setting the plant higher than before may expose roots and cause drying. Keeping the level the same protects the root crown.

  7. Fill and Firm

    Add more soil and fertilizer around the sides. Press lightly around the edges to remove air pockets.

  8. Water Thoroughly

    Give it a deep watering to help roots settle.

  9. Aftercare

    Don’t water again until the top inch of soil feels dry. Freshly repotted plants are vulnerable to soggy soil and root rot if kept too wet.

Watch the video how to repot properly

Shop Garden Supplies

Date: 8 Sep 2025

Papaya mint salad: Quick-n-Fun exotic

Papaya mint salad: Quick-n-Fun exotic

🍴 Papaya mint salad: Quick-n-Fun exotic recipes


🟢Cube ripe papaya into bite-sized pieces.
🟢Toss gently with fresh mint leaves, a drizzle of lime juice, and a pinch of black pepper.
🟢Chill before serving for a refreshing, lightly spiced tropical snack.

Papaya Mint Salad

Ingredients

  • 1 ripe papaya, peeled and cubed
  • Fresh mint leaves
  • 1 tsp lime juice
  • Pinch of black pepper

Instructions

  1. Cube ripe papaya into bite-sized pieces.
  2. Toss gently with fresh mint leaves, a drizzle of lime juice, and a pinch of black pepper.
  3. Chill before serving for a refreshing, lightly spiced tropical snack.

🛒 Add Papaya trees to your garden

#Food_Forest #Recipes #Papaya

🟢 Join 👉 TopTropicals

Date: 6 Sep 2025

Avocado coconut popsicles: Quick-n-Fun exotic recipes

Avocado coconut popsicles

Avocado coconut popsicles

🍴 Avocado coconut popsicles: Quick-n-Fun exotic recipes


🔵Puree avocado with coconut milk and sugar.
🔵Pour into molds and freeze.
🔵Enjoy the creamiest tropical ice pops ever!

🛒 For home-grown ingredients you will need:


Home grown Avocado
Home grown Coconut

Avocado Coconut Popsicles

Ingredients

  • 2 ripe avocados
  • 1 cup coconut milk
  • 2 tbsp sugar (or to taste)

Instructions

  1. Puree avocado with coconut milk and sugar.
  2. Pour into molds and freeze.
  3. Enjoy the creamiest tropical ice pops ever!

#Food_Forest #Recipes #Avocado

🟢 Join 👉 TopTropicals

Date: 12 Sep 2025

Mulberry yogurt swirl: Quick-n-Fun exotic recipes

Mulberry yogurt swirl

Mulberry yogurt swirl

🍴 Mulberry yogurt swirl: Quick-n-Fun exotic recipes


🔵Layer fresh mulberries with plain yogurt and a drizzle of honey.
🔵The berries bleed into the yogurt, creating a natural tie-dye effect.

Mulberry Yogurt Swirl

Ingredients

  • 1 cup fresh mulberries
  • 1 cup plain yogurt
  • 1 tbsp honey

Instructions

  1. Layer fresh mulberries with plain yogurt in a glass.
  2. Drizzle with honey on top.
  3. Let the berries bleed into the yogurt, creating a natural tie-dye swirl.

🛒 Discover Mulberry varieties

#Food_Forest #Recipes

🟢 Join 👉 TopTropicals

Date: 3 Dec 2025

Can Poinsettia grow for years? 5 most common mistakes with new container plants

Poinsettia - Euphorbia pulcherrima tree

Poinsettia - Euphorbia pulcherrima tree

Poinsettia - Euphorbia pulcherrima colorful leaves

Poinsettia - Euphorbia pulcherrima colorful leaves

Poinsettia - Euphorbia pulcherrima in a pot

Poinsettia - Euphorbia pulcherrima in a pot

Poinsettia - Euphorbia pulcherrima bush

Poinsettia - Euphorbia pulcherrima bush

Can Poinsettia grow for years? 5 most common mistakes with new container plants.


You buy a beautiful plant from a big garden center, or maybe you received one as a holiday gift. It looks perfect - lush, bushy, colorful, spotless. But a few weeks later… what happened? It is dropping leaves, getting leggy, or simply dying. Think about poinsettias after Christmas - most end up in the trash like annuals. But poinsettias are actually perennial shrubs that live for many years in their native environment!

So what went wrong? Here are simple ways to avoid these disappointments and keep your new plants as happy as they were in the greenhouse - and even help them grow bigger and nicer for a long time.

❌ Do not put a plant directly into hot, bright sun.


Most nursery plants are grown in filtered light under shade cloth, and sudden full sun can burn the leaves.

✅ Move sun-loving plants gradually into full sun.


❌ Do not rely on the original container.


Holiday and gift plants often come in decorative pots that have issues:
- no drainage holes
- glazed or heavy plastic that traps moisture and causes root rot
- dry, porous terra cotta that loses moisture too fast
- cone-shaped pots that hold water and create waterlogging
- pots that are simply too big or too small for the root system

✅ Use simple black nursery pots with straight sides.


They:
- hold moisture at the right level
- are made of safe professional-grade plastic
- make it easy to remove the root ball when stepping up
For a fancy display, place the black pot inside a decorative planter. It will also act as a saucer to collect excess water - no stress, no mess.

Do not skip checking the soil. Even plants from professional growers can hide surprises:
- the plant may be buried too deep. Large nurseries sometimes add extra soil on top to make the pot look full, but burying the stem can kill the plant in days.
- soil type on top may be wrong. They may pack peat moss or sphagnum on top to keep stems tight for display.
- the entire soil media might be temporary. Many orchids in stores, for example, sit in glazed pots stuffed with soggy sphagnum - not how orchids should grow.

✅ Take the plant out of the pot and inspect the roots and soil.


Remove excess peat or sphagnum. Use a quality, well-drained mix like Abundance and repot into a container that matches the root size or is just slightly larger.

❌ Do not forget fertilizer.


Your plant came from a professional nursery where it likely received constant feeding through a liquid injection system - almost like being on life support. Once removed, it can decline within weeks.

✅ Put your plant on a regular fertilizer schedule.


When repotting, mix in Green Magic controlled-release fertilizer and refresh it every 6 months. Simple and easy! You can also apply liquid Sunshine Boosters - safe to use with each watering.

❌ Do not ignore individual plant needs.


Take a moment to ask what the plant prefers and what to avoid, when buying from a nursery where you can talk to a grower, like Top Tropicals. The grower knows exactly how it was grown and what it likes. Getting a plant is like adopting a baby - knowing its habits makes all the difference!

🛒 Select plants for containers

#How_to #Container_Garden

🟢 Join 👉 TopTropicals