Garden Blog - Top Tropicals

Date: 15 Jun 2021

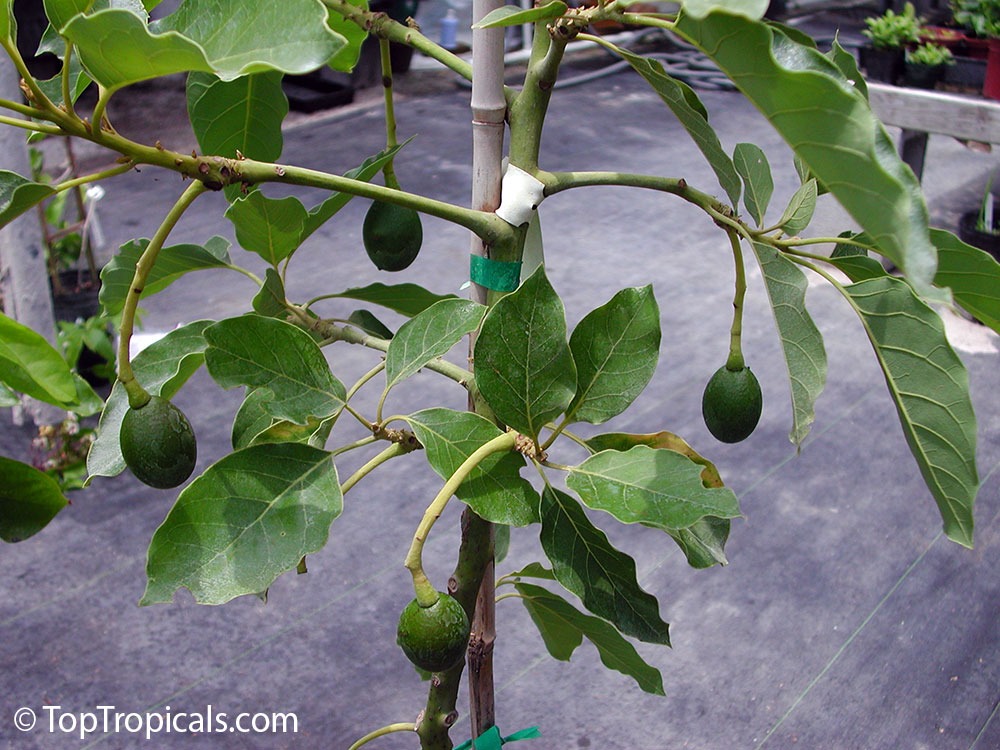
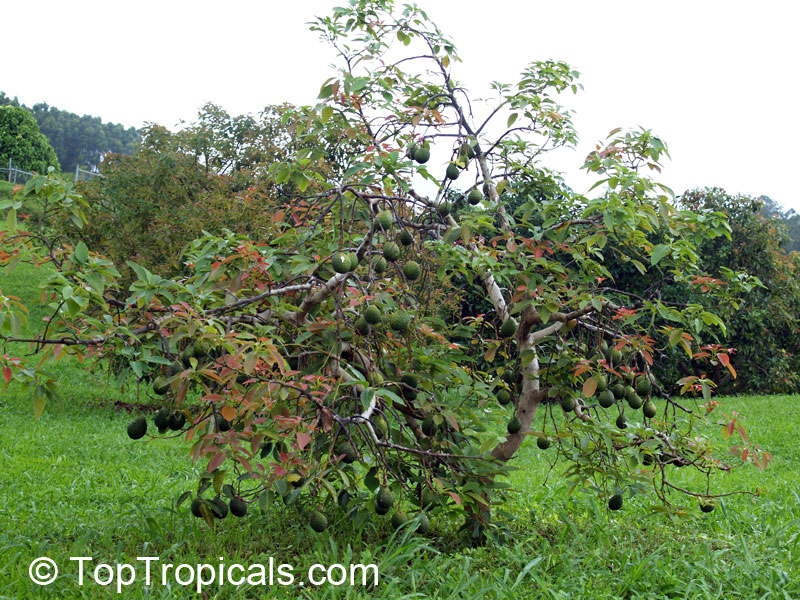
Establishing Avocado tree after shipping

Q: Received my Avocado tree last week and I'm a bit concerned. Is this wilting normal with a new plant? No yellowing, or dropping of leaves. We moved it out of the sun but not sure how to handle?

A: This is normal for after-shipping stress. You did right, position the tree away from direct sun, in shade, preferably under roof (patio?) so it doesn't get over-watered with too much rain and you can control water amount. We recommend to spray the leaves with pure water and put a large clear plastic bag just over the crown (leave the soil to breath). Keep in shade. Within couple days the leaves should perk up. Do not overwater. Water only when the top of soil gets slightly dry. In a week or so, once the plant recovers, you may start moving it gradually into full sun, then to its permanent spot where you want to plant it.
Avocado is not an easy plant to establish. So be careful. It needs lots of water, however, it doesn't like wet feet - so must be planted in a well-drained spot, with at least 4-6"elevation (on a little"hill") so it never gets water-logged. It needs daily water to establish and may need more than just a sprinkler system, use additional hose water when establishing in the ground.

Date: 31 Jul 2025

Anthurium Collector Set

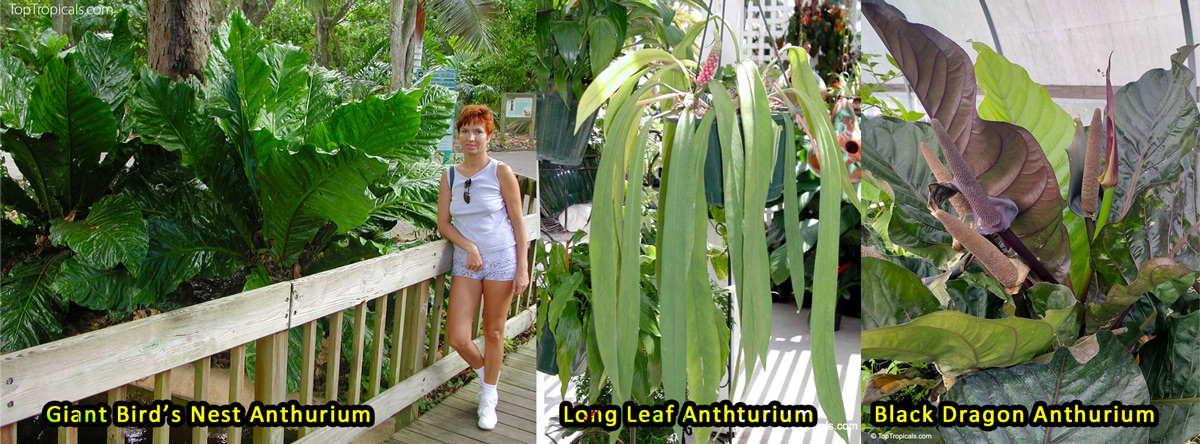
Giant  Bird's  Nest,  Long  Leaf,  and  Black  Dragon  Anthuriums  side  by 
 side,  showcasing  their  dramatic  foliage  and  size

These aren't your typical tropicals - they're collector-grade Anthuriums grown for foliage and texture. Each one brings something different, but they all thrive in the same kind of setting: shade or filtered light, warmth, and humidity. Perfect for growing in containers indoors or out.

Anthurium Black Dragon

This is the most dramatic of the trio. Upright, leathery leaves shift from dark green to nearly black depending on light. Instead of bright flowers, it produces a dark brown spadix and glowing red berries. A hybrid not found in the wild, it's grown from seed - no two are exactly alike.

  • Best for: Indoor focal plant, shaded patio, black ceramic pot
  • Height: 2–4 ft in container
  • Texture: Thick, architectural leaves
  • Highlight: Color shifts with light intensity

Grow Your Own Black Dragon

Read more about Black Dragon Anthurium

Anthurium hookeri – Giant Bird's Nest

This one's about scale. Broad, crinkled leaves with a cardboard-like texture form a bold rosette. It can get huge with time - up to 6 feet across. Perfect for gardeners who want the "instant jungle" look.

  • Best for: Shaded garden, large pots on porches
  • Height: Up to 5 ft; width even more
  • Texture: Wrinkled and leathery
  • Highlight: Bright red berries in maturity

Buy Giant Bird's Nest Anthurium

Read more about Giant Bird's Nest Anthurium

Anthurium vittariifolium – Long Leaf Anthurium
Graceful and rare, this species sends out narrow strap-like leaves that can reach 5–6 ft long. Ideal for hanging baskets or mounting. Bonus: it produces small pink fruit against deep green foliage.

  • Best for: Hanging displays, vertical planters, bright bathrooms
  • Height: Leaf length, not upright height - up to 6 ft
  • Texture: Smooth, ribbon-like
  • Highlight: Cascading growth and color contrast

Buy Long Leaf Anthurium

Read more about Long Leaf Anthurium

✅ How to Care for Anthuriums

  • Light: Bright, indirect light is best. Avoid direct sun, especially mid-day. These plants evolved in rainforest understory - think "dappled light under trees."
  • Water: Keep the soil lightly moist but not soggy. Let the top inch dry before watering. They hate wet feet.
  • Humidity: These are tropicals - they'll do fine in 50-60% humidity, but thrive at 70%+. Use pebble trays or place near other plants. Bathrooms with windows work great.
  • Soil: Use an airy mix: orchid bark + perlite + peat or coco coir. Drainage is key. Never use plain potting soil.
  • Fertilizer: Feed with SUNSHINE Robusta every 2–4 weeks during warm seasons. It's formulated for aroids and won't burn roots.
  • Potting: Use shallow, wide containers. Repot only every 2–3 years, or when roots crowd the pot. They don't like frequent disruption.
  • Temperature: Ideal: 65–85 F. Short dips to the 30s F are tolerated by mature plants, but avoid cold drafts.

Shop All Anthuriums

Date: 8 Jun 2016

How to get Clerodendrum to bloom?

Q: My Clerodendrum thomsoniae is not blooming. Actually it is not doing much of anything except putting out weak growth and small leaves. I purchased this plant May 26. 2015. Over the winter it was in a heated sunroom, at night 60 degrees, where it received some direct sun from the skylights. I reduced the water to prevent excessive leggy growth. I don't see how this plant can take full sun or even part sun. Temps here in Raleigh NC are 80-85 degrees and 65-70 at night, at the moment. I figured I would gradually expose it to more direct sun after being in a sunroom but the leaves burn. I had this plant in San Jose many years ago where it did quite well, blooming with no special treatment. So thought I'd give it a try again. Any advice?

A: Clerodendrums are all time favorites, appreciated by both gardeners and house plant collectors, for their showy, fragrant flowers and very easy culture. When growing Bleeding Heart (Clerodendrum thomsoniae), a few things should be taken in consideration:

1) Temperature.Like most clerodendrums, this plant is semi-decidious outside of tropics and goes dormant in winter. It may lose some or all leaves if temperatures drop below 60-65F. It is not too cold sensitive, the plant can even take some light freeze. However when it is not hot and humid, it slows down metabolism. This means, water should be reduced during cooler months.

2) Light. This plant can grow in both sun and shade like most clerodendrums - this is the beauty of this genus. However like with all flowering plants, more sun promotes more bloom. In shade, it will grow beautiful dark green foliage (leaves will be bigger than in the sun) on the account of flowering; in full sun leaves turn lighter color and sometimes may even get unattractive "faded" look, but flowering will be profuse. Also remember that Arizona full sun is different than New York full sun. Here in Florida, Bleeding Heart can take some full sun, but if exposed to sun all day long, leaves often get sun burn.

3) Acclimation. Also called acclimatization - this is a process when a living organism adjusts to environment changes. Acclimation is always the case when growing plants indoors, even in a sun room. When Spring comes, and especially when we start taking outdoors those plants that have spent a few months indoors, light level increases dramatically, and this may cause leaf loss, and leaf burn. It is not necessarily a bad thing, it is just a mechanism of acclimation. Example: imagine yourself after living in a warm tropical climate, moving to a cold country. For a while your body will feel discomfort from "too much cold", while native residents may feel comfortable. We call it "My blood has thinned after living in Florida" - and this is a physiological fact. And vice versa, if you are a Northerner, moving to hot climate may be a challenge; it will take a while until you get used to hot and humid tropical summers. Same thing with plants: during cooler and darker period, their body (leaves and stems) becomes "winter type", with some serious chemical restructuring. Immediate environment change, like bright light and high temperature, causes a shock to those "winter cells", and as a defense mechanism, the plant gets rid of those useless "winter" leaves, replacing them with new "summer" leaves with completely new chemistry and metabolism.

From what you described, you know your plants, and you know what you are doing. You did everything right by reducing watering in winter and gradually moving the plant into brighter light. You still may see some stress, and this is normal. If you patiently keep changing environment slowly, eventually your plant will generate new healthy "summer" growth, it will also improve more vigorous root grown which will help the plant to establish better and to be stronger. You will see larger, thicker leaves, and definitely some flowers.

Date: 25 Jan 2026

How to grow Winter blooms without sun, indoors or out

Clerodendrum wallichiii - Bridal Veil

✨ How to grow Winter blooms without sun, indoors or out


⭐️ Clerodendrum wallichii - Bridal Veil, is one of those plants that quietly steals the show. It is a graceful shrub that drapes itself in long, hanging sprays of white, lightly fragrant flowers just when many gardens are slowing down. Around fall and into winter, it suddenly comes alive with cascading blooms that really do look like a veil.

Bridal veil Plant Facts

Botanical name: Clerodendrum laevifolium, Clerodendrum wallichii, Clerodendrum nutans
Also known as: Bridal veil, Nodding Clerodendron
USDA Zone: 9 - 11
Highligths Large shrub 5-10 ft tallSmall plant 2-5 ftSemi-shadeWatering: Moderate. Water when top soil feels dryWhite, off-white flowersPlant attracts butterflies, hummingbirdsFragrant plantSubtropical plant. Mature plant cold hardy at least to 30s F for a short time
Get personalized tips for your region


⭐️ One of the things that makes Bridal Veil really special is that it blooms beautifully in bright shade, which is rare - not many flowering shrubs are happy without direct sun. Because it tolerates lower light so well and stays elegant in a container, it also makes a surprisingly great indoor plant in a bright room or sunroom.

⭐️ What you will love most is how elegant but easygoing it is. The plant grows upright with soft, arching branches, usually topping out around 6–7 feet, with narrow, pointed leaves that stay neat and refined. The green stems set it apart from some other clerodendrums, giving it a lighter, airier look even when it’s not in flower.

⭐️ Bridal Veil does best when you treat it gently. It likes bright light but not harsh afternoon sun, and it really appreciates protection from wind. Give it a spot with morning sun or bright shade, keep the soil evenly moist but well drained, and it rewards you without much fuss. It’s a great choice for containers, patios, or sheltered garden beds where you can enjoy the flowers up close.

⭐️ Another bonus - it blooms when you want it most. While many plants rest, Bridal Veil puts on its show from fall through spring, making it a favorite for winter-interest gardens in warm climates. Pollinators notice it too, especially when little else is blooming.

⭐️ If you like plants that feel a bit romantic, bloom off-season, and don’t need constant attention, this one earns its place fast. Bridal Veil is quiet, graceful, and unforgettable once you’ve grown it.

🛒 Start your Clerodendrum collection

📚 Learn more:
💋Clerodendrum wallichiii in Plant Encyclopedia
💋Collecting clerodendrums: big color, little effort
💋Clerodendrum schmitii and Clerodendrum wallichii
💋What is the difference between Clerodendrum schmitii and Clerodendrum wallichii?

#Shade_Garden #How_to #Hedges_with_benefits #Container_Garden

🟢 Join 👉 TopTropicals

Date: 27 May 2026

How to Root Plumeria Cuttings: The Dry Method for Success

How to Root Plumeria Cuttings: The Dry Method for Success
How to Root Plumeria Cuttings: The "Dry" Method for Success ✔️

Plumeria cuttings root with incredible ease if you respect their succulent nature. Most failures come from two mistakes: planting too early and watering too much. Whether you use the traditional potting method or the professional Thailand "Surface" Method, the secret is: Keep it dry until it grows

✍️ Stability Note: Cuttings vs. Grafted Trees


While cuttings are easy, they develop shallow, horizontal root systems.
Best for: Pots and sheltered garden spots.
For windy or hurricane-prone areas: Consider Grafted Plumeria. Grafted trees use a seedling rootstock with a strong taproot, providing much better anchoring and long-term stability.
  • 🌸 5 steps how to root plumeria cuttings - simple method that works
  • 🌸 Step 1: Prepare and Cure (The 5-Day Rule)


Before a cutting ever touches soil, it must heal.
Cut: Take healthy branches 6-12 inches long and remove all leaves.
Cure: Place the cuttings in bright shade with plenty of airflow.
The Goal: Wait 3-5 days until the cut end is bone-dry, firm, and callused.
Pro Tip: Planting a "wet" cutting is the #1 cause of stem rot. If it isn't callused, do not plant it.

🌸 Step 2: Use Fast-Draining Soil


Plumerias hate "wet feet." You need a medium that drains instantly.
The Recipe: 50% professional potting mix (like Top Tropicals Abundancу mix) and 50% coarse sand.
Why it works: The bark provides structure, while the sand ensures water runs straight through, leaving no stagnant moisture.

🌸 Step 3: Planting & The "Thailand Method"


You have two proven ways to set your cuttings:

Method A: The Traditional Pot
1. Hormone (Optional): Dip the dry end in rooting hormone and tap off the excess.
2. Depth: Insert only 2–3 inches deep. Roots emerge from the base, not the stem.
3. Secure: Firm the soil so the cutting doesn't wobble.

Method B: The Thailand Style (Surface Rooting)
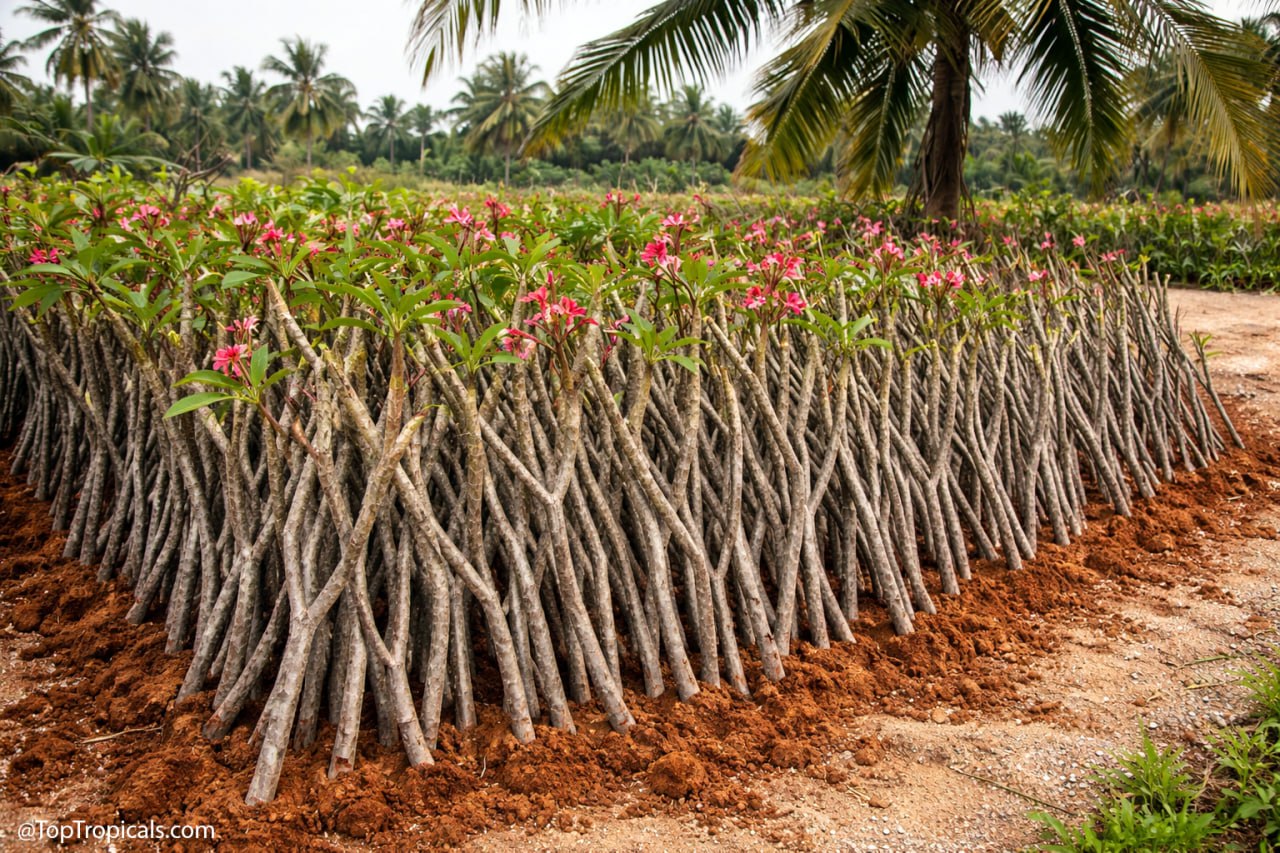
As seen in the image, large-scale growers often don't bury cuttings at all.
1. The Bed: Prepare a bed of well-draining soil.
2. The Placement: Stand the cuttings on top of the soil, leaning them against each other or a support.
3. The Benefit: This provides maximum airflow to the base and zero risk of rot. Roots will naturally dive into the soil as they emerge.

🌸 Step 4: Critical Watering Rules


This is where most gardeners fail.
Initial Watering: After planting, moisten the soil slightly—just once.
The Wait: Do not water again for 5–7 days. The Logic: No roots = No water intake. If the soil stays wet without roots to drink it, the cutting will rot.

🌸 Step 5: Heat, Light, and Air


Sun: Start in bright shade for a few days, then move to full sun. Heat is the catalyst for root growth.
Ground Heat: Placing pots on a warm surface (like a concrete patio or black ground cover) can accelerate rooting.
Airflow: Never root plumeria in a humid greenhouse or enclosed space. They need "open air" to thrive.

🌸 What to Expect


2-4 Weeks: Callusing ends and initial roots form.
4-8 Weeks: New leaf "claws" appear at the tip.
Success: Once you see full leaves, you can begin a regular watering and fertilization schedule.

✅ Quick Success Checklist


Dry the cutting for 3–5 days.
Use 50% sand for instant drainage.
Plant shallow (or use the Thailand surface method).
Wait a week before watering again.
Provide maximum sun and airflow.

❌ What NOT to do:


Avoid frequent watering. If you think it’s time to water, wait one more day.
Plumeria cuttings have no roots to drink with yet.
If the soil looks dry and you feel the urge to water, wait 24 hours. When in doubt, keep it dry.
Remember: You can save a dry cutting, but you can't save a rotten one.

🛒 Shop Grafted Plumeria Collection

📚 Learn more:
· Plumeria varieties in Plant Encyclopedia
· #PlumeriaRainbow

#Perfume_Plants #Container_Garden #How_to #Discover

Dwarf Plumeria Plant Facts

Botanical name: Plumeria alba
Also known as: Dwarf Plumeria
USDA Zone: 9 - 11
Highligths Large shrub 5-10 ft tallSmall tree 10-20 ftFull sunWatering: Moderate. Water when top soil feels dryWhite, off-white flowersFragrant plant
Get personalized tips for your region
🟢 Join 👉 TopTropicals