Garden Blog - Top Tropicals

Date: 29 Jun 2026

😾 When Orange Isn't a Good Thing

Smokey,  a  tuxedo  cat  dressed  as  a  rust  detective,  examines  a  plumeria 
 leaf  with  a  magnifying  glass  while  Sunshine,  a  relaxed  orange  tabby,  lounges
    with  a  coffee  mug  inside  a  greenhouse  filled  with  healthy  blooming 
 plumerias.  Outside  the  greenhouse,  rain  falls  on  rust-infected  plumeria 
 leaves,  illustrating  how  wet  foliage  promotes  plumeria 
 rust.
Smokey: Those orange spots are plumeria rust.
Sunshine: Orange is an excellent color.
Smokey: On cats, yes. On plumeria leaves, no.
Sunshine: I represent the good kind of orange.

🌸 Plumeria Rust in Humid Climates:
What Finally Worked for Us

By Tatiana Anderson, Plant Expert, Top Tropicals

Side-by-side  photos  of  healthy  plumeria  plants  with  lush  green  foliage 
 and  no  signs  of  rust,  growing  in  pots  inside  a  greenhouse  and  outdoors  at  a 
 tropical 
 nursery.

Healthy plumerias with clean, vibrant foliage after successful rust management. Good airflow, bright conditions, and effective fungicide treatment help keep plants growing strong through Florida's rainy season.

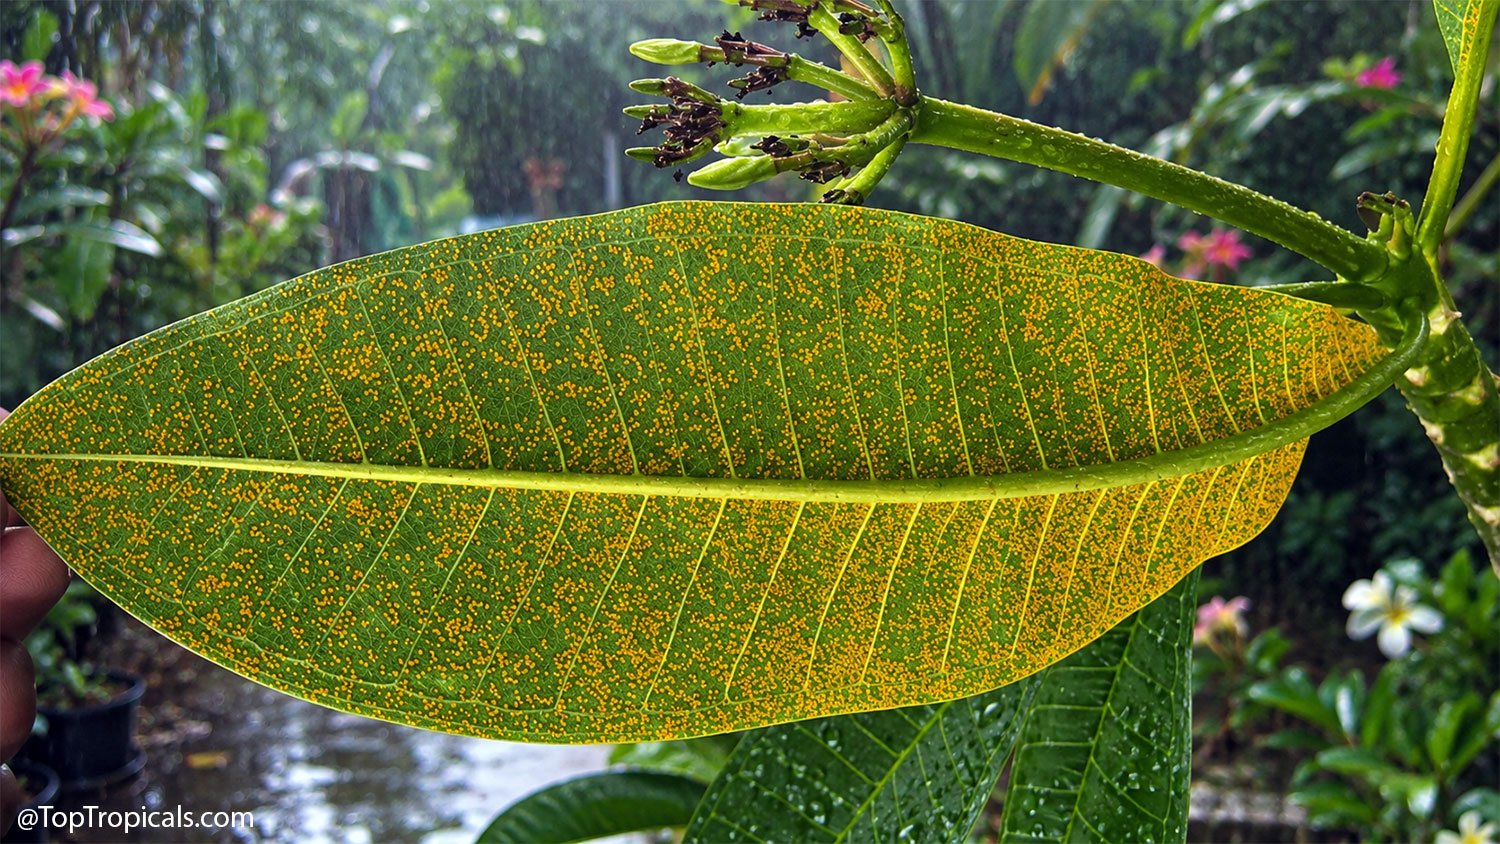
If you grow plumerias in Florida, you probably know what comes next. Around June, when the rainy season begins and afternoon thunderstorms become part of the daily routine, orange-yellow spots start appearing on the undersides of plumeria leaves. Plumeria rust arrives almost like clockwork. If you have ever tried to fight it, you know how frustrating that battle can be.

Close-up  of  the  underside  of  a  plumeria  leaf  covered  with  bright  orange
    plumeria  rust  spores  during  rainy  weather,  with  a  lush  tropical  garden 
 blurred  in  the 
 background.

Plumeria rust appears as bright orange powdery spores on the underside of leaves. Warm, humid, rainy conditions allow the fungus to spread quickly, making it a common sight in tropical and subtropical gardens.

Let me be clear about something right away: Plumeria rust is rarely fatal to an otherwise healthy plant.

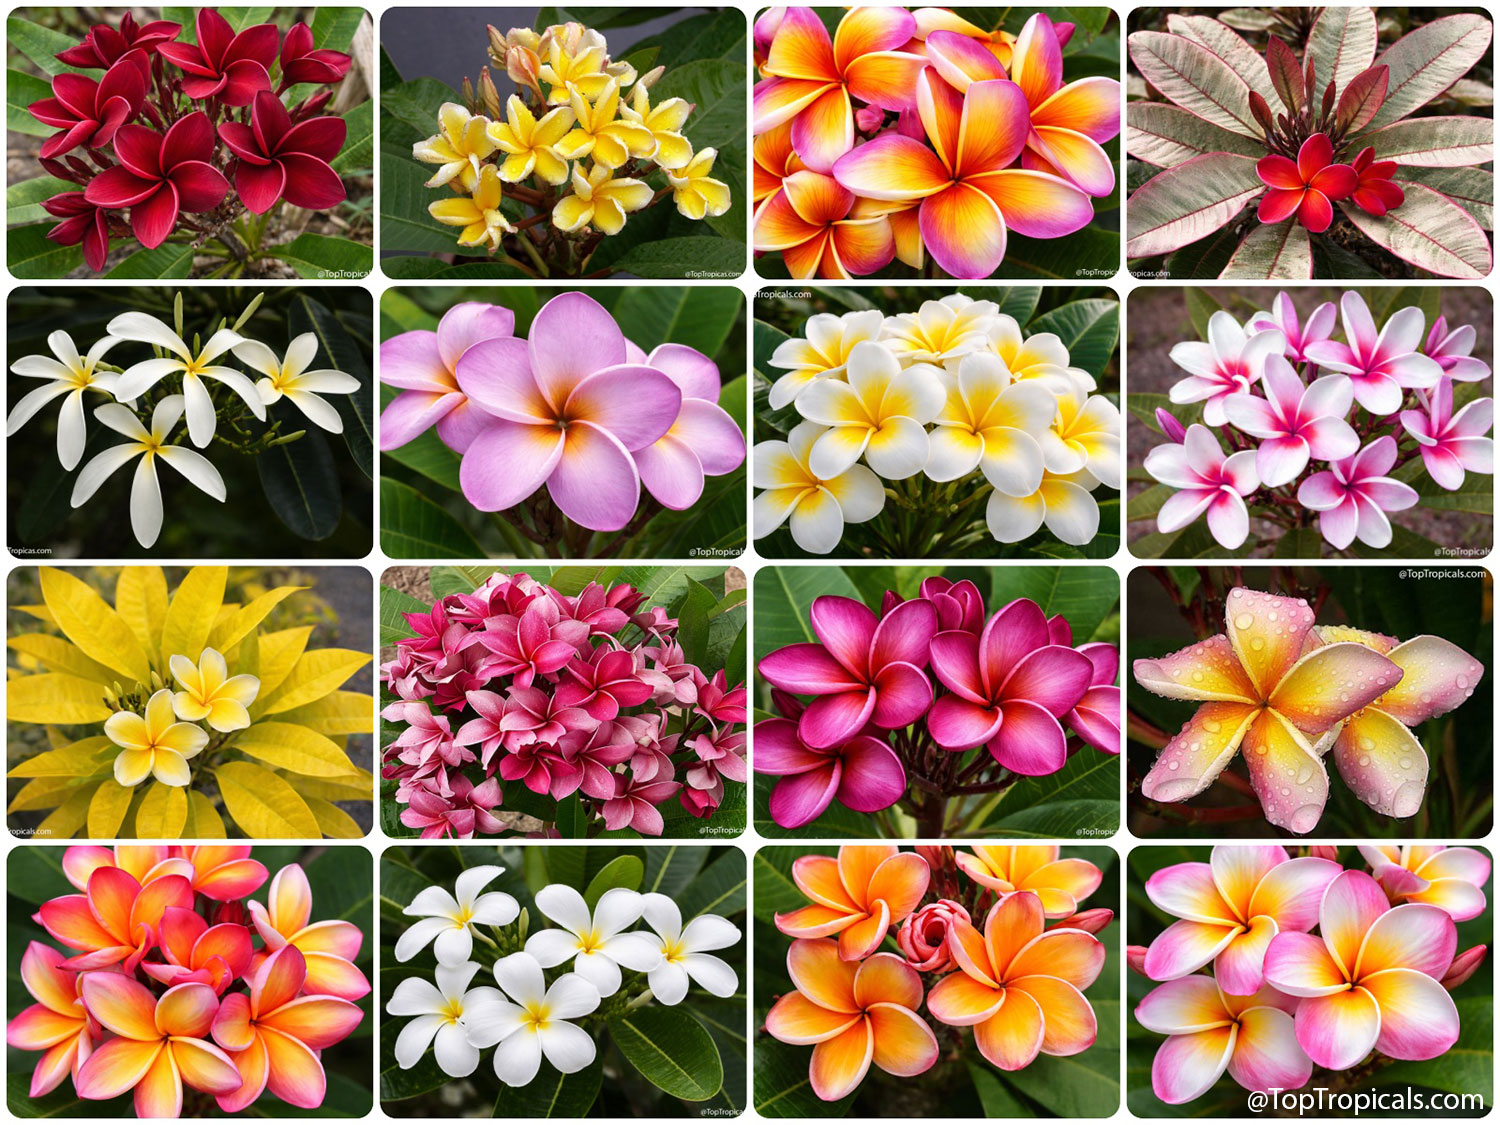
In our experience, we have never lost a healthy plumeria to rust alone. The disease is mostly cosmetic, but it causes significant yellowing, triggers premature leaf drop, and can turn a beautiful specimen into something that looks ragged throughout the best months of the growing season. For a plant grown as much for its attractive foliage as its spectacular flowers, that matters.

At Top Tropicals, we have grown plumerias for many years and have tried most of the approaches gardeners typically recommend: sulfur-based fungicides, neem oil, copper sprays, improving drainage, and removing infected leaves before they hit the ground. Some of those things helped to varying degrees. None of them felt like a real breakthrough until recently.

The Fungicide That Actually Did Something

Comparison  image  showing  healthy  plumeria  leaves  after  treatment  with 
 Southern  Ag  Garden  Friendly  Fungicide,  alongside  an  inset  photo  of  a  leaf 
 covered  with  orange  plumeria  rust  spores  before  treatment.

Real-world results after treating plumeria rust with Southern Ag Garden Friendly Fungicide. The inset shows a leaf heavily infected with orange rust spores before treatment, while the main image shows clean, healthy new foliage after the fungus was brought under control.

A few seasons ago, on the recommendation of another grower, we tried Southern Ag Garden Friendly Fungicide . This biological fungicide contains the beneficial bacterium Bacillus sp, and I want to be careful here: I am not suggesting it is the best product for everyone or that it will produce the same results in every situation. What I can say is that, in our experience, it was the first fungicide that consistently produced visible improvement when applied according to the label directions.

We applied it at the first sign of rust, repeated applications according to the label, and actually saw the progression slow down while new infections became less severe. Whether that was the product, the timing, or some combination of factors, I cannot say with certainty. But after cycling through several options over the years, it was the one that felt like it was doing something real. If you are looking for a starting point, it is worth trying.

But the fungicide wasn't our main discovery. That came this past season, and it changed how we think about this disease.

☔️ What This Season Taught Us About Leaf Wetness

Healthy  plumeria  plants  with  lush,  dry  green  leaves  growing  inside  a 
 greenhouse.  The  foliage  is  clean  and  free  of  rust,  showing  vigorous  new 
 growth  under  bright  filtered  light.

Healthy, dry plumeria foliage is one of the best defenses against plumeria rust. Good airflow, bright light, and keeping leaves dry whenever possible help prevent the fungus from taking hold during the rainy season.

This season we moved our prized container plumerias under a covered growing area with a clear plastic roof and approximately 30 percent shade cloth overhead. The structure provides excellent light, warm temperatures, and very good air circulation while protecting the plants from Florida's frequent summer rains. It is not a climate-controlled greenhouse, but rather a protected outdoor growing area.

Here is the important part: these plants were still irrigated regularly, every two to four days, with overhead watering. The leaves did get wet. But because they were not sitting outside during Florida's daily summer downpours, the foliage dried within a reasonable amount of time instead of remaining wet for hours, which is common after a heavy rain followed by cloudy skies and still air.

The result? Not a single case of rust developed on those plants throughout the season. Considering how consistently plumeria rust appears each summer in our nursery, that result immediately caught our attention. The most significant difference was how long the foliage remained wet after watering or rain. Meanwhile, plumerias growing in the ground nearby, fully exposed to the weather, showed rust infection at the usual time.

💦 Ambient Humidity vs. Standing Water

That observation made us rethink what we believed was driving the disease. We had always assumed Florida's high humidity was the primary factor. Humidity certainly plays a role. But this experience suggested that prolonged leaf wetness may be a much more significant factor than ambient humidity by itself.

There is a real difference between air that feels humid and leaves that stay wet for four, six, or eight hours after a rain. Humid air means the moisture content of the atmosphere is high. Wet leaves means there is standing water on the leaf surface. Both conditions can occur together, but they are not the same thing. A leaf in a humid but breezy location can dry within an hour. A leaf in still, wet conditions after a heavy rain may stay wet most of the day. That difference may be far more important than many gardeners realize.

We are not plant pathologists, and we do not want to overstate what we learned from one growing season. But after many years of growing plumerias in Florida, the results were convincing enough that we now protect our best container specimens from prolonged summer rainfall whenever possible.

👉 What We Recommend

Based on many years of growing plumerias in Florida, here are the practices that have worked best for us:

  • Grow plumerias in full sun whenever conditions allow. Good light means faster drying after rain or irrigation, and plants grown in low light often seem to show rust symptoms more readily.
  • Keep your plumerias well-fed. Healthy, vigorously growing plants recover from stress and disease much better than weak ones. We apply Green Magic controlled-release fertilizer every six months for a steady supply of nutrients, and supplement with Sunshine Boosters Megaflor during the growing season. Because Megaflor is gentle, it can be safely applied with every watering, all year long.
  • During extended rainy periods, consider moving valuable container plants under cover if possible. Even a covered patio can make a difference if it keeps the leaves from remaining wet for most of the day.
  • Provide air circulation. Plants crowded together stay wet longer. Space them properly and position them where they receive good airflow.
  • Remove infected fallen leaves. They can continue serving as a source of spores. Pick them up and dispose of them rather than leaving them beneath the plants.
  • If rust begins to appear, start fungicide applications early. Slowing an infection at the beginning is much easier than trying to control one that is already well established.

💡 A Realistic Conclusion

Five  healthy  potted  plumeria  varieties  displaying  white,  pink,  yellow, 
 magenta,  and  multicolored  blooms,  arranged  in  a  row  with  lush  green  foliage 
 and  clean,  rust-free 
 leaves.

A parade of healthy plumerias in full color. Clean foliage, bright blooms, and vigorous growth show what plumerias can look like when rust is kept under control, letting each variety shine in its own unique colors.

Plumeria rust is mostly a cosmetic problem rather than a life-threatening one. Healthy plants usually recover well, but yellowing foliage and premature leaf drop can take much of the beauty out of an otherwise beautiful blooming season.

We cannot promise these methods will eliminate rust in every garden. Every growing environment is different. However, after years of battling this disease, reducing how long the leaves remain wet made a bigger difference than any other single change we have tried. If you grow plumerias in a humid climate and continue struggling with rust, it may be worth focusing not only on humidity itself, but also on how quickly the foliage dries after the rain stops.

📚 Plumerias in Top Tropicals Garden Blog

👉 Start your Plumeria collection

Plumeria Special
Buy 2 or More Plumerias, Save 25%
Mix and match your favorite varieties! Purchase 2 or more plumerias and receive 25% off all plumerias in your order. No coupon code required. Discount is applied automatically when qualifying items are added to your cart.
Valid through July 3, 2026
Offer applies to new orders only. Not valid on previous purchases, pending orders, gift certificates, shipping charges, or combined with other discounts or promotional offers.

Collage  of  sixteen  plumeria  varieties  showcasing  an  extraordinary  range
    of  flower  colors,  including  white,  yellow,  pink,  red,  orange,  multicolored,
    and  variegated  foliage,  highlighting  the  remarkable  diversity  of  plumeria 
 blooms.

Plumerias come in an amazing spectrum of colors and forms. From pure white and buttery yellow to fiery reds, soft pinks, rainbow blends, and even variegated foliage, there is a plumeria to match every tropical garden and collector's taste.

Sunshine: Healthy plumerias need sunshine... that's me... good airflow, and dry leaves.
Smokey: That's a surprisingly accurate summary.
Sunshine:We can help with all of that. Donut worry. Coffee first.

Date: 26 Sep 2021

Edible Landscape: fruit bearing hedge

Photo above: Biquinho Pepper (2 months old plant)

Q: My mom had to remove a hedge for some renovations and after being heartbroken about losing my little bird haven, I've decided to plan on a fruit bearing hedge that offers some privacy and places for the little fledgling to wait for food. Any suggestions? I was thinking blueberries or citrus but open to any ideas.

A: Below are a few suggestions for a fruit bearing hedge planted with fast-growing, tropical species. They will contribute to a nice edible landscape for both your family and the birds - they will be very happy!

Larger size hedge (small trees), grows full-size within 1 season:
- Loquats
- Dwarf Mulberries (very cold hardy too) such as Dwarf Everbearing

Medium size hedge (shrubs or vines), 2-3 seasons to grow full size:
- Black Surinam Cherry Lolita
- Blackberries and raspberries

Low hedge (4-5 ft tall, 1 season, fast growing):
- Biquinho Pepper
- Wiri Wiri Pepper

Citrus is probably not a good idea, not bird's favorite, and blueberries require a special acidic soil here in Florida, so they will need extra maintenance, special soil, and heavy mulching.

Blackberry hedge

Surinam Cherry Lolita, 2 year old plant

Loquat (5 years old bushy specimen)

Date: 25 Jan 2021

Coastal Plants. List of plants that do well in coastal areas

In the photo: Delonix regia - Royal poinciana, Flamboyant

Q: How can I get a list of plants that do well in coastal areas (i.e. next to sea)?

A: Many tropical plants live by the sea in natural habitat and don't mind ocean breeze. We have a large selection to pick from. The following groups of spectacular flowering trees will enjoy coastal environment:
Cordia trees
Plumerias
Orchid trees (Bauhinias)
Caesalpinias
Callistemons (Bottle brush trees)
Cassias
Many palm trees

See full list of salt-tolerant plants available at this time.

In the photo: Cordia sebestena - Scarlet Geiger tree

Date: 27 Feb 2020

7 secrets of a Happy Avocado Tree

Q: I purchased an avocado tree from local garden centers three times but every time it dies on me. My neighbor has a nice tree in his yard and it grows beautifuly. I just purchased one online from you and I need to know what I was doing wrong? Are there any secrets how to make an Avocado tree happy? I have a big garden and several mango trees, but no luck with Avocado...

A: Avocado tree is famous for being such a pain to establish. But once it starts growing, it's growing! We will share a few simple tricks how to make it right.

1. Plant high and provide good drainage. Wet feet is number one reason for failing an avocado tree. It doesn't like wet soil and won't tolerate soggy conditions. Plant it in the highest spot of your yard and slightly on a "hill" (3-4"higher than the surrounding ground).
DO NOT plant Avocado tree in low spots or wet spots of your yard. Save those spots for Cannas or Black Sapote or even a Mango if you want a fruit tree there.
2. Use quality soil. Use only well-drained soil with high content of organic matter. You may add compost to existing sandy soil, or add some professional potting mix that contains pine bark and perlite. Remove rocks from the hole if you see any while digging. Dig a big hole and fill it with a good soil; compact the soil in the hole very well before setting the root ball. Reminder: plant the tree high!
3. Water regularly. After planting an Avocado tree in a nice high spot with a good drainage, start watering it... daily! Avocado likes water, although it doesn't like wet feet! Once you figure out this combination, you've got the recipe of success. Water by hand daily for the first week after planting, then twice a week for couple weeks, then once you notice new growth - you may rely on sprinklers, but keep watching the tree and don't let the soil over-dry. It must be slightly moist, but not soggy.
4. Fertilize. For such finicky tree, we suggest mild formulas of fertilizers. Dry fertilizers may burn roots, especially of a young tree. Even smart-release granulated fertilizers should be used very carefully. The best way to feed your young avocado tree - get a complete set of Sunshine Boosters Pro system. It has all necessary elements for all stages of plant development and never burns the roots. Sunshine Boosters Pro can be used with every watering - no need to guess how much and when. Besides, it is a natural fertilizer based on amino acids - exactly what you want to use on your fruit trees and other edibles!
5. Boost immune system of the tree. Apply Sunshine Epi plant hormone every 2 weeks as a foliar spray to boost immune system and metabolism of the tree and protect it from diseases. Epi makes plants (especially young plants) grow twice faster! It also enhances effect of fertilizers by increasing plant metabolism.
6. Do not prune until you see significant growth. The tree is small and can use as many leaves and branches as possible for photosynthesis and healthy metabolism. We suggest to avoid pruning for at least the first year. On the second year your tree most likely will be covered with flowers (assuming you followed fertilizer program). Let it go through the blooming stage and setting fruit; prune in Fall after fruiting is over.
7. Keep number of fruit to minimum for the first crop. Don't let the small tree exhaust itself. Keep just 2-3 fruit to develop. The next year, no need to control fruit quantity, the tree will develop as many as it can support.
P.S. If you got the tree from a mail-order, remember to establish it in a pot before planting in the ground; move gradually from shade to sun. Follow planting instructions.

Learn more about Sunshine Nutrition System - a Natural solution for your garden.

Date: 25 Nov 2019

Flavor of Feijoa Superfood

by Onika Amell, tropical plant specialist

Q: What exactly is Feijoa - Pineapple Guava? Does the fruit really taste like pineapple? I am curious to know if it is easy to grow.

A: Feijoa is certainly one of the easiest fruit trees to grow as it does not require much care. It is an attractive, evergreen tree or large shrub with dark green, oval, leathery leaves. It has an abundance of uses in the garden and produces lovely edible flowers and fruit! The fruit is eaten fresh, added to smoothies or fruit salad and is also commonly used to make delicious jams and wicked chutneys. Feijoa fruit go a long way in flavor.
This plant is drought tolerant and will grow in almost any soil type. It loves full sun or partial shade and is wind resistant. A lot of gardeners like to grow it as a wind barrier for this reason. It can easily be shaped into a dense, informal hedge or screen that needs very little pruning. Because of this density, it provides excellent shelter for all kinds of wildlife. Butterflies, birds, and butterflies will all love you for growing Feijoa!
Space the plant five feet apart to create a wind barrier hedge. Heat does no not bother it at all and it will also withstand temperatures to 10 degrees F.
The plant gets its names from the delicious perfume it emits. Some folks seem the fruit taste like pineapple, with a slight minty undertone. Others feel the flavor reminds them of juicy fruit gum! The texture is described as smooth and slightly gritty - almost like a pear, but firmer.
If you prefer to grow this plant as a tree rather than a large shrub, simply remove the lower branches up to one-third of the tree's height over a period of time. The Pineapple Guava can grow up to 15 feet wide and tall. They also do really well as a container plant on patios where you can truly enjoy the lovely fragrance of the fruit. It prefers rich, organic, well-drained soil and will need light fertilization every other month in most soils.

We recommend:

Fruit Festival Plant Food - Super Crop Booster
Mango-Food - Smart Release Fruit Tree Booster
SUNSHINE-Honey - Sugar booster
SUNSHINE C-Cibus - Crop Nutrition Booster

Pretty, pink, edible flowers will wow you from May to June, followed in late summer or fall by the delicious and fragrant fruit. An interesting thing about this fruit is that you don't pick it. It falls to the ground when it is ripe. Or simply place something under your tree, like a tarp, and shake the tree. The ripe fruit will fall off. You can store the fruit in your refrigerator for up to a week. And remember! The fruit of the Feijoa is not only a very rich source of soluble dietary fiber, but also an excellent source of Vitamin C, and very rich in antioxidants. They are also low in calories. Each fruit only holds 55 calories.